Getting Started
I’ve been meaning to set up my personal website for some time now, but as with most things, getting started was the most difficult part.
I am not a web developer by trade, so I needed something simple, elegant, and easy to maintain. With the caveat that I am professionally certified in AWS, I was able to complete everything on this page in a single (rather full) day.
Early on, I decided I wanted to host a serverless website on Amazon’s S3. After some research, I decided to go with Jekyll, as I’m experienced in Ruby and JavaScript.
Other benefits of Jekyll:
- Simple blog structure with modular components
- Highly supported with custom themes
- Easy development and deployment
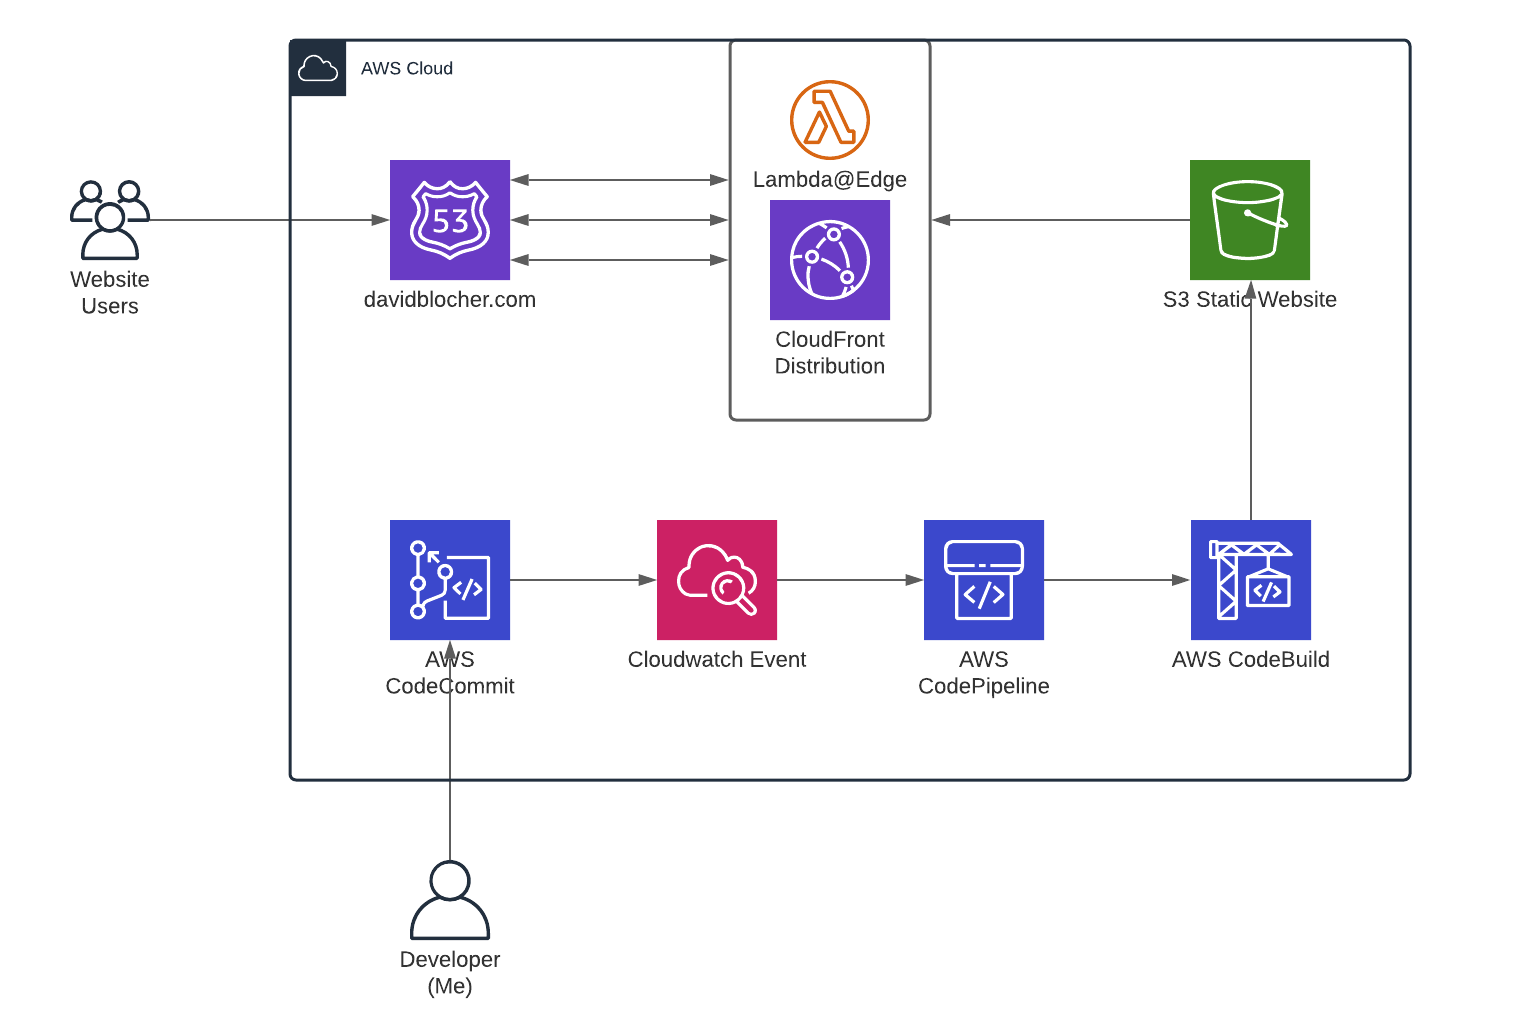
In addition to standing up my website, I wanted to use this opportunity to practice using AWS-native development tools. My goal became hosting my personal website on S3, with a fully automated continuous deployment pipeline, and a content delivery network to ensure my site is snappy worldwide. Although it was not part of my initial goal, I also ended up utilizing a bit of edge computing! Here are the basic steps I took to meet this goal:
- Install the Jekyll gem, choose a theme, and make my initial commit to CodeCommit (AWS’s version of GitHub)
- Create a CodeBuild project which syncs the post-build artifacts to my s3 bucket
- Create a CodePipeline that kicks off my CodeBuild project whenever new code is pushed to CodeCommit
- Use Amazon Certificate Manager to apply an SSL certificate to my domain
- Create a CloudFront distribution network to serve static content from edge locations
It should be noted that I already had Ruby installed (v 2.7.2), and I already had an AWS account with my domain registered through Route 53.
As with any project worth doing, the bulk of my time was spent addressing some niche pain-points, which I will outline in the sections below.
Jekyll and CodeCommit
By far the smoothest sailing part of this project was initializing the repository. First I initiated my Jekyll site by following these great video tutorials by giraffeacademy. Then I created a CodeCommit repository from the AWS console, initiated a git repo locally, and followed AWS’s guide to Connect a local repo to the CodeCommit repository.
CodeBuild and CodePipeline
Once I had set CodeCommit as my remote repository and pushed up my initial commit, it was time to create my pipeline. Luckily, I found this fantastic tutorial by Alex Bilbie that got me 95% of the way there. I followed his tutorial exactly with three notable exceptions:
First, my repository was CodeCommit instead of GitHub. This is a trivial change that does not require much explanation.
Second, you no longer have to specify Ruby runtime for the CodeBuild execution environment, it is now included in the standard image. See my CodeBuild settings below:
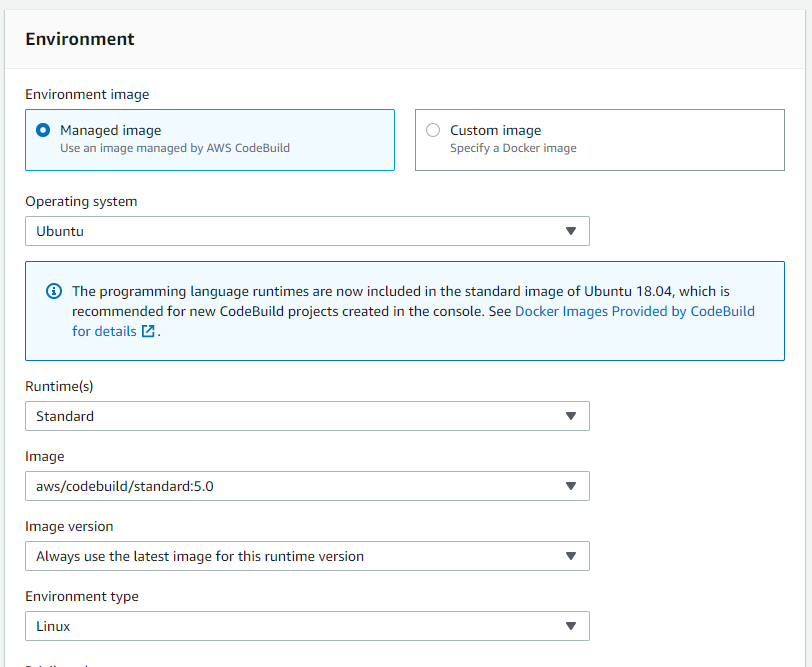
| Environment Setting | Value |
|---|---|
| Operating System | Ubuntu |
| Runtime | Standard |
| Image | aws/codebuild/standard:5.0 |
Third, I did change the buildspec.yml file to use bundler, as the Jekyll theme I started with had a Gemfile:
version: 0.1

phases:
  install:
    commands:
      - gem install jekyll bundler
      - bundle install
  build:
    commands:
      - echo "******** Building Jekyll site ********"
      - bundle exec jekyll build
      - echo "******** Uploading to S3 ********"
      - aws s3 sync _site/ s3://yourbucketname
This is not the last we will see of the buildspec.yml, because we just ran into our –
First Big Challenge - Getting Pretty URLs out of S3 Hosting
After testing the CodeBuild project and finally getting my first successful build after several tries, I was disappointed to see that, aside from the menu bar and the home page, the content was not loading when I accessed my website through my S3 bucket’s public URL. By default, clicking “About” on the menu takes me to
.../about
After some troubleshooting, I found that I could get the content to load if I manually entered
.../about.html
That’s when I learned the S3 static website hosting cannot imply file extensions when a request is made. I was facing the gruesome prospect of having to add “.html” to the end of all of my navigation links… I had to find another way. That’s when I Googled my way to this ingenious solution by Marcelo Canina. Marcelo describes stripping the .html extension from every non-index file that gets added to the S3 bucket. While S3 cannot imply file extensions, it can handle an extension-less file containing html.
Once again, his solution got me 95% of the way there, but finding out how to make it work with CodeBuild was a pain. After blacking out for 3 hours while pounding on the keyboard, I eventually came to this relatively simple solution:
I ultimately added a bash script called “html-strip.sh” to the root of the project (the first line is important!):
#!/bin/bash
find _site/ -type f ! -iname 'index.html' -iname '*.html' -print0 | while read -r -d $'\0' f; do mv "$f" "${f%.html}"; done
If you want to fully understand that bash command, Marcelo breaks it down nicely in the article linked above.
My buldspec.yml ended up thusly:
version: 0.1

phases:
  install:
    commands:
      - gem install jekyll bundler
      - bundle install
  build:
    commands:
      - echo "******** Building Jekyll site ********"
      - bundle exec jekyll build
      - echo "******** Removing Extensions from HTML files ********"
      - ./html-strip.sh
      - echo "******** Uploading to S3 ********"
      - aws s3 cp _site/ s3://davidblocher.com --content-type text/html --recursive --exclude "*.*"
      - aws s3 cp _site/ s3://davidblocher.com --recursive --exclude "*" --include "*.*"
After the build creates the library of content including all of the .html files, the bash script cycles through them and removes “.html” from any html file name not called “index.html”, creating new copies of each such file without the extension. Then, all relevant files are copied over to S3.
After this challenge was solved, setting up the CodePipeline as described in Alex Bilbie’s tutorial was trivial.
Amazon Certificate Manager and CloudFront Distribution
Getting an SSL certificate for a domain you have registered with Route53 can be confusing, but it’s extremely simple once you know where to go. First you request a public certificate through ACM, then you have to validate your ownership of the domain by email or DNS. I chose to validate my domain via DNS.
The only stumbling block here was finding the dang dropdown arrow that gives you access to the “Create Record in Route 53” button:

The beauty of using Route53 as your registrar is that ACM can inherently automatically renew your certificate whenever it nears
After waiting a few minutes for the certificate approval to process to complete, setting up the CloudFront Distribution Network was relatively simple. Below are the settings I chose for my CloudFront Distribution by following Amazon’s documentation:
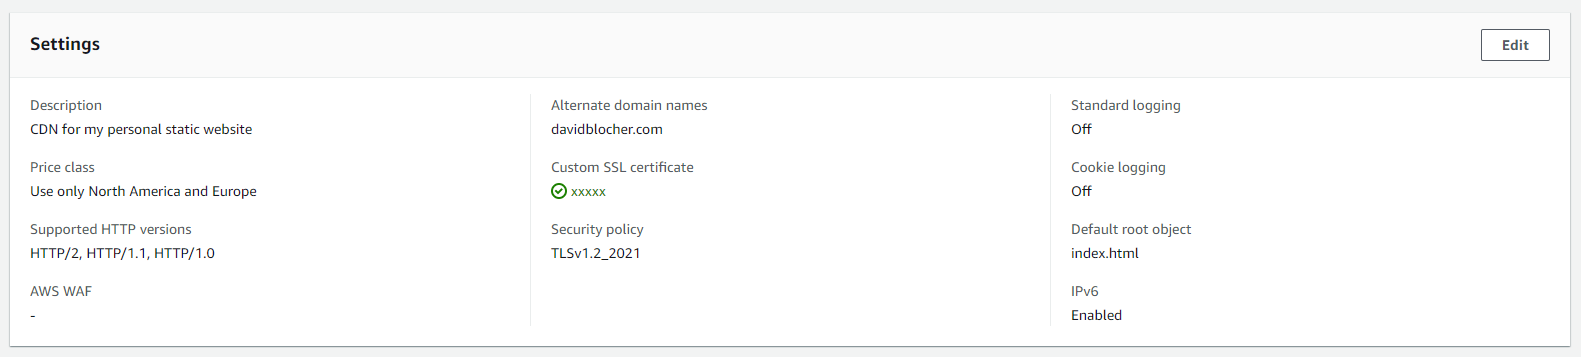
Shortly after submitting the request for my CDN to be created, my website was up and accessible through my domain name! However, there was a problem…
Second Big Challenge - CloudFront and index.html Files in Subdirectories
My Blog page did not load when accessed through the CDN. Strangely, it worked fine when viewed through the direct link to my S3 bucket’s URL. The only distinction between my Blog page and the other pages on this site is that “./blog/” contains its own index.html file, separate from the index.html found in the root of the project. The problem was not present in S3, so I knew it was not another file extension issue. This problem was unique to CloudFront.
After some hours floundering, flopping, and eating dinner, I came upon the actual problem and its solution all at once thanks to Ronnie Eichler of AWS.
Surprise! Lambda@Edge
While I did not intend to use edge computing for the first version of this website, apparently it’s a great solution to the issue described above! Basically, the default root of “index.html” that I set in the CDN settings does not automatically work for subdirectories. But, with a little Lambda magic, I can redirect my users to the appropriate index.html, and this small bit of compute exists at all of the edge locations where my static content is held, thus creating no significant impact to performance.
By following the blog post linked above, I easily created the Lambda function needed to make this redirect possible.
I did hit one snag because the blog post fails to mention that you need to add “edgelambda.amazonaws.com” to the Trust Relationship policy of the function’s IAM Role (or I missed an important configuration setting), as outlined in this AWS Documentation. This can be hard to find, so follow these steps:
- Navigate to your Lambda Function and click on the “Configuration” tab
- Under “Execution Role”, click the role name that was generated upon creating the function (NOT the “Edit” button)
- Click the “Trust Relationships” tab and edit the existing trust relationships
My Trust Relationship policy looks like this:
{
  "Version": "2012-10-17",
  "Statement": [
    {
      "Effect": "Allow",
      "Principal": {
        "Service": [
          "edgelambda.amazonaws.com",
          "lambda.amazonaws.com"
        ]
      },
      "Action": "sts:AssumeRole"
    }
  ]
}
After successfully implementing this Lambda function with CloudFront as its trigger, everything works! The website looks and feels great, and I’m proud to say I’m now the owner of one of one of the world’s most over-provisioned websites! Send all your friends!
Pricing
I will update the monthly pricing here as I get bills. Though, it seems most of these services fall well within free tier pricing. CloudFront, the most active and wide-spread service of the bunch, still only costs me 8.5 cents for the first 10 TB of data transferred each month. CodeBuild is billed by building minutes, and this month (July) will by far be the most building minutes I’ll ever do for this site. Overall I expect the total cost of ownership to be under $0.75 per month indefinitely.
| Service | Monthly bill (July) |
|---|---|
| CloudFront | $0.00 |
| CloudWatch | $0.00 |
| CodeBuild | $0.05 |
| CodeCommit | $0.00 |
| CodePipeline | $0.00 |
| Route53 (domain) | $0.50 |
Conclusion and Next Steps
This project was super fun and I’m chuffed to learn how inexpensive it can be to run my own website, including a completely integrated development pipeline and world-class performance.
Next I would love to add more features using Lambda@Edge, and make this mostly-static site a little less static (but always serverless)! I also want to explore more uses of AWS when it comes to chatbots in Discord and Twitch, as well as integrating Lambda, APIGateway, and IoT services with my (currently dust-gathering) Arduino. Let me know what you want to see and I will take it into consideration!
If you want your website to look just like mine, the “Personal” Jekyll theme is available here: